
Let’s get started with mixing our love for real estate and Zuckerberg’s baby – Facebook! Oh how it has grown!
Even those of us that live under rocks (no judging!) have heard of Facebook, which just goes to show you the power it wields. It’s a huge market you NEED to tap into when creating your online real estate presence. There are about 2,500,000 New Zealand users on Facebook and this is growing. Chances are your next client is looking for you here! Do you exist? If yes, AWESOME! You deserve a golden star. Here you go ★. Didn’t get a star? Don’t worry, once you’re through with this series you will have earned one!
Some can make creating and maintaining a Facebook page sound daunting (especially those with a commercial interest in you using their services to set-up your page). It’s not! We’re now going to set you up with a Facebook page in 4 easy steps!
Step 1
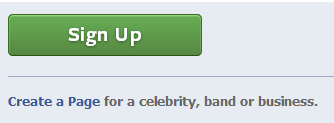
The first thing to do is go to Facebook.com and then begin to create your page. You will see under the big green “Sign Up” button a link that says “Create a Page”. This is what you click on to get started.
Step 2
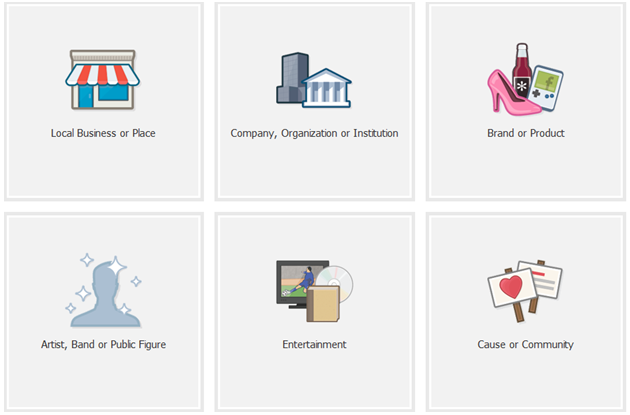

Next, you can choose any of the 6 options presented to you, however, the 2 that I feel would suit your purpose best are “Local Business or Place” and “Artist, Band or Public Figure”. If you own your own real estate business then obviously you’ll go with the first. If you are just making a Facebook business page for yourself as an agent, I would go with the second. Either way, all you have to do is click on the appropriate image, fill in the required information and hit “Get Started”.
Step 3
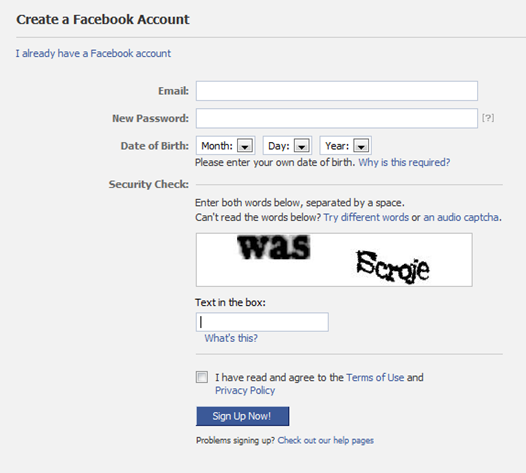
That will lead you to the screen above and again, just fill in your information, making sure to use an email address that you check often. You do not want to miss any inquires from potential clients or even current clients. If you already have a personal Facebook account, you can click the link that says “I already have a Facebook account” and manage your page through your personal account.
Step 4
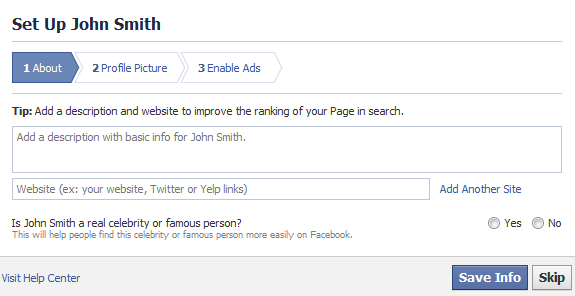
Here you can fill in all your pertinent information that will show potential clients all the real estate services you have to offer. You will also tell them why they should choose you. As you know, a large part of the real estate business is marketing. Make your description really creative and catchy. Also use as many links as you have for clients to find you – your own website, Twitter, Blog, etc. Put them all in the link section one by one by hitting “Add Another Site”.

After you have completed this step, click “Save Info” and continue on. You will then be asked to upload your profile picture. This is the picture that will be seen on your page for the Facebook world to see so make sure it shows you off in a good light. If you wish to use a logo, make sure it is relevant and people can relate it to you. A picture of yourself would work best however so prospects know who they are dealing with. To upload simply click where it says “Upload From Computer” and upload the same as you would any other image on any other site. TIP: Use a .PNG file instead of a .JPG for your profile image. I’ve found it comes out clearer and crisper.
That’s it you have now created your basic Facebook business page. Congratulations!
Facebook ADS
Enabling Ads is a decision you can defer for the time being while setting up your page. You can always come back to this later on. Ads on Facebook depend on your budget and the amount of reach you want. Also think about targeting the right audience for your ads when you place them. You ideally want your real estate ads to be seen by people who will what to buy what you have or those that will list with you. Displaying these ads to a 13 year old for instance could be a waste of your budget spend, unless he is a young GAZILLIONAIRE. Facebook allows you to confine your ads to certain areas and search terms which is quite cool.
The Admin Panel & Working with your Facebook Page
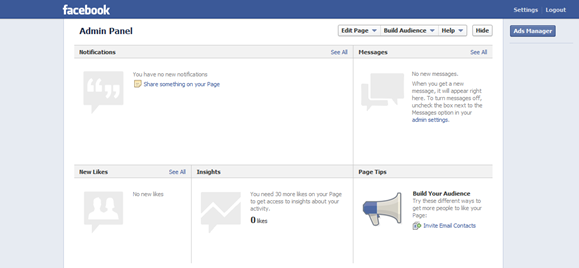
The section shown above (your Admin Panel) is where you can view all the stats of your page, all the comings and goings. This can only be seen by you and no one else. It is pretty straight forward to use, giving you notifications whenever someone posts something to your wall and showing you when someone likes your page. “Insights” show you how well your page is performing.
If you have any questions with regards to this section feel free to comment below and I will do my best to help.

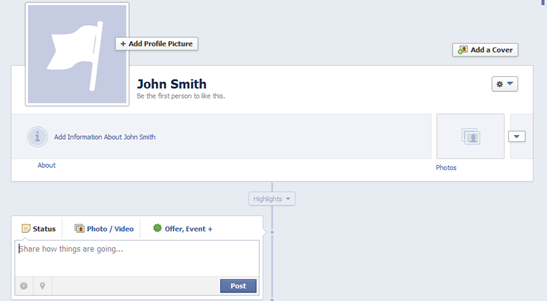
If you scroll down further, you will see what the public can see as they view your Facebook page. The flag above is where your Profile Picture will show and your About section contains relevant information that you previously entered about your real estate services. If you need to make changes, you can easily do so here by clicking the About section again and entering new information.
Cover Image
Let’s focus on the “Add a Cover” button. This is where you spruce up your presentation that much more. While your profile picture shows off your logo or yourself, your cover image can show off all your real estate services in one quick glance. Simply upload your banner, the same as you would any other image anywhere else, and then position it to your liking. Hit “Save” and you have completed one of the final steps needed. Check out our Facebook page if you want to get an idea of what a cover image looks like.
Status Updates
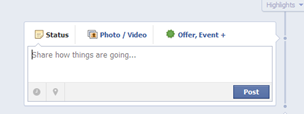
The status box is where you can post updates on what’s going on in your real estate world. Simply type in what you want to say and click “Post”. You can also hit the “photo/video button” to upload pictures & videos that you want people to see. This is a great feature to use if you want to post a picture of a new listing. TIP: With your updates be personable, the more people can relate to you, the more they will stay around and look at what you have to offer.
Create your Unique Facebook Page URL
Now for the final step when creating your Facebook page. Take a look at your page’s URL up above. It will be something like Facebook.com/pages/your name/a bunch of nonsense numbers. How easy is that to remember? Not easy at all. If potential clients can’t remember your Facebook page address, you are making it harder for them to find you. Internet users can be lazy. They want things to be easy to find and they “want it now”. So let’s change that address.
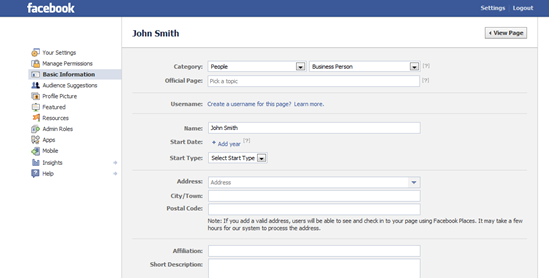
To do this all you need to do is scroll go to your Admin Panel, click “Edit Page” and then click “Edit Settings” from the drop down menu. Next click on “Basic Information” on the left hand side and create a username for your page. Say you entered the username “topagent” (This is just an example, I’m not sure if the username is already taken). Instead of all those random numbers at the end of your Facebook page address, your new facebook address would be facebook.com/topagent. Super easy to read and distribute!
All other settings on the side are pretty straight forward I feel and really don’t warrant us going through them. You can check them out at your leisure and ask questions below if needed!
Conclusion
Right! So I tried to keep this post as basic as possible to help those that haven’t had a lot of experience with Facebook. As always, questions, comments and feedback are always welcome. I will respond to you.

Next week we will take a look at how to make our Facebook page an even better place to be with Facebook Apps. I will also compile a list of apps that you might find useful in your real estate game.
Until next week…ciao and happy Facebooking!